Roller Blade Training for Skiing

Want to get those ski sensations during the off season? Want to improve your skiing? Roller blading might offer the solution to both of these needs without a flight to the southern hemisphere.

The mechanics of roller blading and skating can certainly be different than skiing. Instead of focusing on the differences, lets talk about the similarities.

Skating involves changing edges using a lateral tipping movement. This mimics changing edges on skis extremely well. In the video above, there are moments on the ramp where the “edge change” is sequential. This would create a wedge (opposing edges), rather than the clean edge change associated with carving (corresponding edges).

Rotary movements in skating are similar to skiing. You can use upper body rotation, but as in skiing leg rotation gives a more subtle and desirable control over the outcome. The short turns demonstrated in the video show mostly leg rotation with the hip pointing towards the camera.

Fore aft is the main reason that I got back into skating. After my first season as a ski instructor it was pointed out how far in the backseat I had become accustomed to skiing. You just cannot do this on skates. If you do, you fall backwards, and learn quickly where the center of your foot and balance needs to be in order to prevent this.

So get out there are make some turns. Whether on skis or blades, have a great time!

Promotional Video

A tiny bit of skiing in Nozawaonsen Japan. Unfortunately did not film the really fun powder

Nozawaonsen Japan was an incredible skiing experience. The powder and terrain were out of this world, and the need for an Avalung was pretty real in order to breath during face shots. Unfortunately this video does not do any of that justice. It just captures a few ski and ride moments from the trip, but barely does that. Nozawa has a half pipe that was fun on the sunny days, and I didn’t get any footage of that either…

Chat on the lift, Ski down the Hill

My favorite group size fits on a quad. Not because I don’t like more or less people, but because I find that we can cover most of the information related to skiing and getting to know each as a group without taking up time on the side of a hill.

Generally I teach groups that are slightly larger than this, and I make sure to mix in with everyone on the chairlift rides. I have gotten to the point where I tell/request everyone who they are going to ride with in order to avoid confusion in the lift lines, and also to vary my fellow passengers. Obviously this is not a hard and fast rule with kids since a responsible adult needs to ride with children for safety reasons. In a family private I usually ride with the kids, but only after telling the parents no smooching on the way up.

Most of the chairlift conversation is not ski related either. This is a great time to establish general communication patterns with people. They need to understand my communication patterns, tones, intonations, pace, etc. Telling a joke might tell you more about how the person thinks then other avenues of discourse. Listening to the guest allows the instructor/guide to learn their guests communication methodology.

Once these communication patterns are established, then the chair becomes a vehicle for learning. It becomes a fantastic stage allowing for the delivery of a more verbose thought on skiing. The chairlift is a better than standing on the side of the hill freezing with the wind making it hard to hear or see.

Don’t get me wrong, it is important to demonstrate things to people, and this is easiest to accomplish on the hill, but the more an instructor can eliminate standing around, the better the ‘ski lesson’. After all, people take a ‘ski lesson’ in order to ski.

Remember to ski in your next ski lesson!

Head Knight Helmet System


I get asked about the Head Knight helmet quite a bit.  Before this helmet and lens system I would ski without goggles because contact lenses had become to irritating, and I prefer to have corrective lenses most of the time.  This system is great for everybody, but particularly useful for people who wear glasses and want a nice and affordable option.

Having purchased this helmet in the 15/16′ season, I have purchased a new helmet for the 18/19′ season.  The new helmet is blue and comes with an extra lens for even more versatility.  I could easily have gotten another year out of the helmet, but my father wanted it for snow blowing since it is warm and provides a nice face shield.

One issue I did have with this helmet system was snow entering the top of the lens on powder days.  This never happened in the east since the snow flakes are a bit larger, but in Colorado it was an issue on a few days per year.  Keep in mind that I skied over 300 days with this helmet, so a few days was not a deal breaker. 

If you are in the market for a new helmet or goggles, definitely take this system into consideration.  It functions well, and looks pretty good when the lens is down! 

Setting on edge VS Pushing to an Edge

So most people tend to push their skis to an edge.   Now that we established that, let’s talk about setting skis on edge.   The difference is subtle, but definitely noticable.

Setting the skis on edge happens when the feet and lower legs are tipped in the direction of the desired turn, allowing the edges to grip the snow, this sets the skis carving.   It is that simple!?!

Pushing the skis is very common, and involves pushing the skis (base of support) away from the body (center  of mass).  Most skiers perform this operation in order to “lighten” or “unweight” their skis allowing for a faster turn across the fall line.   This may be done to gain confidence and overcome fear at first, but quickly becomes the favored movement pattern. 

So the advantages of not pushing the skis include: better grip,  better ski performance, and more predictable movement patterns

There are of course times when pushing the skis can prove helpful, but this should not be adopted as the default movement pattern since it doesn’t offer the ski performance needed for day to day skiing.

Next time you head out, play with setting your skis on edge, and enjoy the top part of those turns!

Dolphin Turns – The Hows and the Whys

Dolphin turns are a great movement pattern for advanced to expert skiers who want to improve their performance in the bumps.  What dolphin turns provide is ability to manipulate fore/aft pressure along the length of the skis, ski snow contact at transition, and an ideal body movement pattern for flying through the air.
I like to think about the general movement pattern for dolphin turns as a reverse bicycle pedal, and this is typically how you will see them introduced.  Using one foot, you would slide one ski forward while picking up the tip and pushing down on the tail.  Now pull the knee toward the body, and ski off of the ground.  With knee picked up, push the tip of the ski into the snow by pulling the foot back under or behind the body using a flexion of the knee.  This is the movement pattern you will want to perform with both skis at the transition of the turns.  Practice moving your feet through this circular movement pattern several times on each side.

The next step is to try both skis at a stand still.  Using the poles for support is great when practicing this exercise.  Kick the feet forward from the body or center of mass.  This will lever you on the tails of the skis and allow the tips to shoot off of the snow.  Now flex the knees up to the chest to get the retraction and bring the skis off of the snow.  You can apply some of your weight to the poles since you do not have the dynamics of the turn to give you the additional pop needed.   If done correctly the flex of the knees will set the skis up to land on the tips or forward of the binding on the skis.  Do not worry about the height of the skis for this drill, but aim for accurate movements.

The next step is to try this in a traverse.  You do not need to change edges.  Just practice the same movement pattern as above several times going across the hill.  Make sure to try this on both sides.

The next and final step is adding this at the transition of your turns.  Again, don’t worry about the amplitude of the movement pattern, just worry about the accuracy.  Another focus should be to complete your turn.  This will give you additional magnitude (turn forces).  You want this magnitude because you are going to use this along with levering back onto the ski to pop the skis off of the snow.  When the skis come off of the snow, you should change edges in the air and dive the tips back into the snow using a flexion of the knee joint.  Diving and landing on the tips softens the landing and allows the skis to hook up and engage the snow rather nicely.

Be careful not to over cook the landing to much.   I have had a few jumps off of moguls where the tips were vertical on landing and my body continued forward over the handle bars!   Since this is usually directed down the hill you are falling that extra distance.   Trust me,  you only do this a couple of times, because it does hurt!

This movement pattern feels great, and really mimics getting air born!  It is a great movement to get you forward when you want that optional air off of a jump, roller, or mogul.  It also helps with mogul skiing by giving you the movement pattern to keep your skis perpendicular to the snow surface most of the time.  Adding dolphin turns to your repertoire will add a degree of fun and versatility to your skiing that will keep your skiing fun and playful!

It took me several months of focused effort to get this movement pattern down, so be patient, keep practicing, and have fun with it!

The Non Linear Fun of Increasing Edge Angle in Skiing or Riding

It is well known that increasing edge angle of a ski or snowboard will increase the grip of the device on the snow (assuming proper platform angle).  It is also known that with “shaped” skis/snowboards the effective radius is given by measured side cut radius multiplied by the cosine of the edge angle (this is a rough calculation, and we will talk about supplements and limitations to this).  What this means is less intuitive unless you get out a calculator and increase the edge angle drastically.  To avoid this confusion and make this both easier to understand and apply on the snow, lets take a look at the graph of the multiplier vs the edge angle:
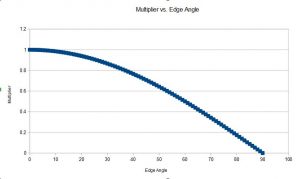
As you can see, at 90 degrees the multiplier becomes zero, so obviously there is a cut off to how much the ski will actually bend!  You will also boot out before you get anywhere close to this edge angle!  But the main thing to note is the non linearity of the curve.  That is, the more you tip the skis or snowboard over, the more drastically the effective radius reduces!
Degree of Edge Angle
Percent of Side Cut Radius
1
99.98%
10
98.48%
20
93.97%
30
86.60%
40
76.60%
50
64.28%
60
50.00%
70
34.20%
80
17.36%
As you can see, the reduction in radius becomes most pronounced above 30-40 degrees.  This is perhaps why this law of ski and ride is little known and explored.  Is tipping a ski on edge to these extremes practical?  In racing the answer is undoubtedly YES!  Ted Ligety and Mikaela Shiffrin are great US Ski Team examples of this, and almost all racers achieve these aggressive edge angles to help them carve tighter turns, and gain better edge engagement with the icy race courses.
 
What about the applications for the mere mortals out on the slopes?  Is this practical?  Perhaps it is not, but it certainly is fun!  When a ski is tipped to extremes, about 40 degrees, the sensations of the turning forces becomes extremely fun and the grip of the ski is also enhanced (assuming again, that we maintain a platform angle that allows for gripping).
 
For people who are athletic, the ability to tip the ski to a degree greater than 30 degrees offers a superior ski performance.  My current ski has a 13.5 meter radius (Head Rev 75 2015 Model Year).  Tipped on edge to 30 degrees this ski carves roughly an 11.69 meters arc (86.6*13.5), just 10 degrees more of tipping to 40 degrees give me an effective radius of 10.34 meters.  These naturally do not sound like huge reductions until we get to 60 degrees or a 50% reduction in the effective side cut.  At 60 degrees our 13.5 meter ski is effectively carving a 6.75 meter arc!  What FUN!
 
Above 45 degrees of edge angle things happen fast!  Your skis are now carving a much tighter arc which increases the forces created by the turn (Velocity*Velocity divided by radius creates the outward acceleration of the turn).
 
Physics of the ski above 45 degrees are also very different.  The body motions which normally achieve fore aft pressure as we know them, start to translate into rotational forces on the skis (changing the direction the ski is actually pointed).  Leg rotation can start to alter the fore aft pressure along the slicing edges of the skis above 45 degrees of edge angle.  This may sound misinformed until you give it a try!  Just keep in mind that these skills blend depending on the edge angle.
 
Lets talk about things that allow the ski to decamber (bend into an arc, think opposite direction of camber) to these degrees when tipped up on edge.  First the skier/rider should have good fore aft balance.  This is important to ensure that the contact across the entire length of the ski is maintained.  When skiing softer conditions like powder the ski will achieve higher decambering due to the body pushing through the center of the ski more than the tips and tails (which are bent upward by the powder).  This will push the center of the ski down into the snow, which will decamber it naturally.
 
So we have talked about ‘bending’ the skis.  Obviously you have to push on the skis to bend them, but pick up a ski and push through the binding.  This literally takes maybe 20 pounds of force… which is not a lot of force to expend onto the skis.  Keep in mind that when skiing a turn, you actually gain or lose the forces of the turn, so your forces exerted through the skis may be greater or less than your actual weight.
 
The main points of this talk are that, the relationship of the edge angle to radius reduction is not linear, but the effective radius decays more exponentially.  Get out and play with tipping your edges to a higher degree if you feel competent and comfortable.  Just be careful, this is very advanced skiing and carving, and can be very dangerous if done incorrectly.  Thank you